
I’ve already written about my reasons for choosing to cosplay Jyn Erso, who has captivated me since before “Rogue One” came out. This post is entirely about the construction of the costume.
Jyn’s ensemble is a pair of relaxed-fit black pants, a relaxed-fit gray shirt, and a cropped brown vest. She also has an olive green bomber jacket and gray woven scarf when she visits Jedha, but I wanted to make the costume from the end of the movie so I won’t be covering those garments here. Everything about her clothing and accessories is very utilitarian. The vest resembles old military flack vest with ample pockets and the pants are similar to work-pants like Dickies or Carhartts.

I created a Pinterest Board full of images of Jyn’s costume and I will keep adding to it as I see more high res images of her costume. Now that the DVD/Blu-Ray of “Rogue One” has come out you can be sure that there are more high-res character images flooding the internet.
Jyn’s Gray Shirt
Jyn’s shirt is a medium-gray woven shirt, likely made of linen, cotton, or similar natural fiber. Based on the creases at her elbow joint, I chose linen which creases very easily. The shirt is worn tucked into her pants. The sleeves are 3/4 length and have a relaxed fit.
The shirt collar is the most distinctive feature the collar has a flap that hangs open slightly. I think these inset front collar pieces extend up to the back collar, but I did not measure it right and I had to create a separate back collar piece.

You can see in this second image, that Casian has a similar overlapping collar, although his looks like it is more than just the collar. Both Han Solo and Lando Calrissian wore shirts with similar open flap collars.

These shirts are reminiscent of medieval tunics with split collars – which made room for the head and make the garment easy to pull on and off without zippers, buttons, or other fasteners. There is some socio-economic coding in that style of dress. Compare it to the fitted and detailed clothing of the senators in the Resistance. These simple clothes, like Luke’s tunic and trousers, could be read as “peasant” or “working class” in this Empire. They are not the privileged class, they don’t have access to abundant resources (or tailors). All of this makes sense for the Star Wars universe, which has always been as much fantasy as sci-fi. The flap also has a military aesthetic as well, since they are part of a fighting force. Think of double breasted coats, with the top unbuttoned.
 Base pattern: New Look 6203. View “H” Bodice with “A” sleeves. (Available at Joann’s, similar fabric and craft stores, online.) This pattern is based on the Chinese cheongsam. The silhouette skims the body but has enough ease for a wide range of movement.
Pattern Modifications: Changed the collar and neckline; cut front on the center front (CF) rather than the full width; shortened the H sleeves to a 3/4 length
The pattern has two asymmetrical front bodice pieces. I traced half of the larger piece and then treated it as “cut on the fold” rather than “cut one flat”. I started by cutting out a normal
 To make the collar, I pinned a string on my dress form to mark where I thought the flap should fall. The bottom of the flap collar hit just above the top of her breasts. Then I cut two pieces of tissue paper and play around with their placement until I got the desired folded flap.
The pattern pieces look like this:


After wearing this shirt, I would add at least 2 more inches to the length of the shirt. I don’t think my pants waist band ended up being as high as I thought it would be, so the shirt came untucked in the back a few times during the convention.
For installing the sleeves, just follow the instructions in the pattern.

Jyn’s Pleated Black Pants
These relaxed fitting woven black pants are likely made with heavy twill, cordura-like fabric, or maybe even denim. The black is very deep. I found a bolt of black “Italian Cotton Twill” at my local fabric store for $12 a yard. The weight and weave felt like exactly what I was looking for. Bonus: the weave is so tight that the fabric was semi-water repellant when I got caught in a short rain shower.
The pants have a top stitched seam down the front center of each leg, adjustable straps just below the knee, and a pin tucked panel on the outer shins.
Jyn’s pants are not super baggy, but they are also not skin tight. They remind me of work pants – Dickie’s, dockers, and carhartts which leave enough room for a wide range of movement.

I am not 100% convinced that the back of the pants has a center seam, but I ended up making it with one anyway.

Base pattern: Simplicity 2245, Lisette Portfolio Pants. (Out of print)

NOTE – You don’t need to use that exact pattern.
I already owned it, so using it saved me money.
If you are looking for pants patterns, I recommend ones with a straight leg, natural or mid-rise waist and a semi-relaxed fit.
With modifications, like raising the waistline on this Burda pants pattern, view B already has a seam below the knee that could work with Jyn’s pants design (just ignore the thigh seam).
Pattern modifications: Panels front and back; moved side zipper to front fly.

This is the original pattern with my full butt adjustment and with the design lines already added. The dart in the back pants was essentially removed and the center seam follows where that dart would have been.
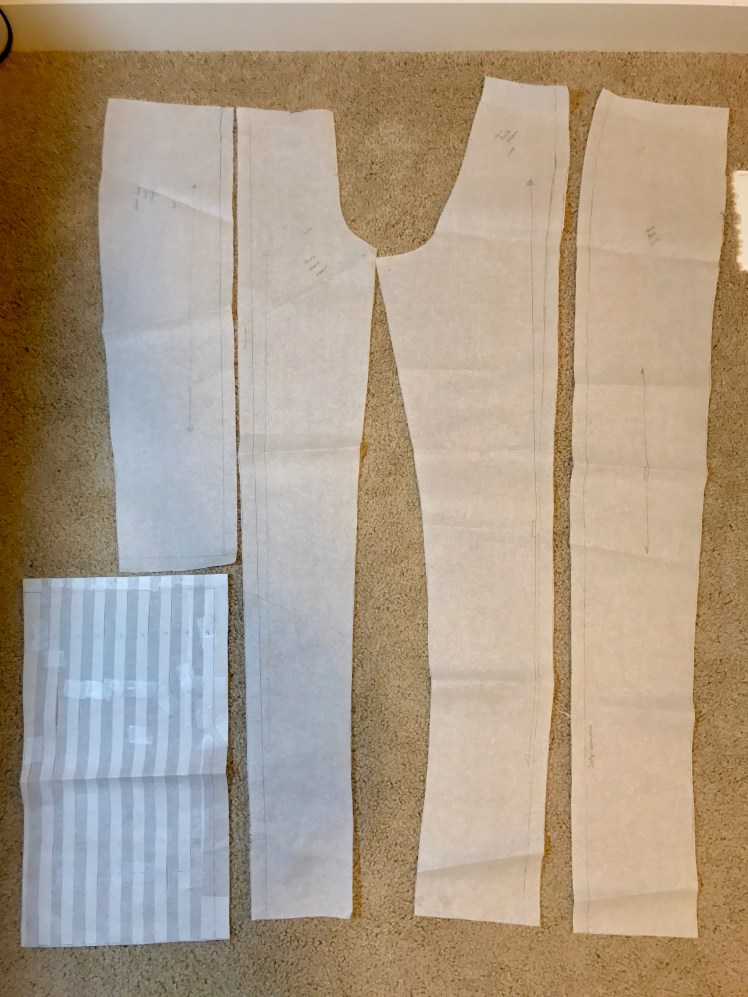
If you aren’t comfortable with splicing up a pattern, you could just topstitch a line down the middle of the panels to look like a seam. It won’t have the same weight and bulk as a real topstitched seam, but it is a time-saving solution.
I had to change the zipper placement from side to center front, which meant I had two partial front waistbands instead of one.

The outer shin portion of the pants features 8 pin tucks that are topstitched. To create this, I drew the lines on the base pattern, then traced this, but after tracing a line I shifted the tracing paper over so that each pin tuck was spaced 1/4″ apart.
Pintuck tutorials are abundant: http://www.burdastyle.com/techniques/sew-neat-tiny-pintucks.
I topstitched the pin tucks and the rest of Jyn’s pants with all-purpose thread. But jeans usually use a thicker specialized “topstitching” thread, which I used for the vest stitching. But I’m getting ahead of myself.


These pintucks are probably my favorite part of the costume. It is an uncommon detail that makes the pants identifiable.
Knee straps and buckles–

For the knee straps, you need 4 things:
- a strip of the pants fabric that is 2 inches wide and a couple inches longer than 1/2 the circumference of the pants pattern at your knee.
- 1-inch strap adjusters in black plastic – Available at Joann’s and similar for approx $2.00. This is similar to the adjustment hardware on your backpacks.
- One yard of 1-inch gray strap – you could go with beige or gray here, it is up to you and your costume’s color scheme.
- Cut four lengths of the gray strap. Two 6″ and two 13″
The 6″ is not adjustable, it is at the front section that loops through one end of the hardware.
The 13″ is the adjustable section. Loop through the strap adjusters then sew to the black strip of fabric and the to the main pant leg.

The gray strap should look like it is inserted through the channel of black fabric at your knee. It is up to you if you want to make this a fully adjustable strap or stationary.
Jyn’s Utility Vest
This cropped and padded vest has multiple pockets, straps, hardware, and lots of topstitching.
The pattern was based off of my North Face down vest. I pinned it to the appropriate length and then traced the shape. No need for pattern fitting.

Hot tip: if you have clothes that fit like the costume, used them as templates. You know they already fit!
After I had traced out the vest pattern, I drew on the pockets, straps, and quilting details.


I chose a medium brown bull denim for the vest, purchased from Cali Fabrics. I think that her vest could be made of a more utilitarian materials (like a lightweight Cordura or other fabric that might be used for duffle bags, hunting gear, or water-resistant coats). I was shopping online and just wasn’t able to feel the material so I went with something that I knew.
Let’s have a conversation about the challenges of brown. These two photos were taken 7 hours apart and the only difference was the left side had a third light in the room that casts more yellow. I think the right is a bit more true to how I see the fabrics in person.

So translate this comparison to reference images for Jyn Erso. Her vest (and other costume parts) changes color with the lighting. Depending on which image you used for reference, the color brown you see will vary. I think this explains why you see so many variations of brown in the existing cosplays. What I am trying to say is: there is no “perfect” color for her vest. So don’t beat yourself up.

The top stitching lines are 3/8″ apart, except on the pocket hems, where it is 1/4″ apart. Do the topstitching BEFORE you assemble the vest. Then the edges of the topstitching are locked inside the seam allowance and won’t come out. I used a grayish-brown topstitching thread by Guttermans, available at Joann Fabrics. Choose your topstitching thread after you have chosen your brown fabric. You may want something more gray or something more brown in order to stand out against the main fabric.


Vest hardware – I cannibalized a RCA cable to get the black strap. The hook on it is a extra large “hook and eye” component that I bought in the notions section of Joann’s Crafts.


Pockets & Straps – I also attached the pockets and straps to the exterior of the vest BEFORE I attached the lining. I didn’t need the stitches to go all the way through every layer.

Vest Padding – The front of the vest has a single layer of cotton batting sandwiched between the exterior and the lining layers. I sewed this to the front exterior vest pieces before attaching the front and back pieces or the lining.
The back of the vest has a single layer of thicker (1/2″) polyester batting. In contrast to the front lining, because this was so thick, I stuffed it in between the lining and the exterior of the back AFTER all of the pieces had been sewn together. Then I marked dots on the back of the vest where the quilting knots were made to hold all three layers together.

Vest Waistband – I want to redo and add elastic to the inside of this waistband. It ends up sticking out too much.

Jyn’s Accessories
Holster – I do plan to make a replica, but I ran out of time. For ECCC I used a black belt and a brown holster that my husband used for his Malcom Reynolds cosplay.
Blaster was made by Cosmic Ash Studios and he is working on death star data plans for me as well. Check out his page if you are interested in ordering a blaster of your own.

Shoes – A number of motorcycle-style boots are available on Amazon. Jyn’s boots are ankle combat boots. It looks like they have covered the laces with a flap (you dont’ want laces getting caught in an action scene) to make it look more futuristic. I bought these.
Gloves – use the keywords “brown fingerless motorcycle gloves”. Please note that there are far more mens options than womens. Many listings on Amazon don’t indicate if they are mens or women’s sizes. In fact, I think what I bought is a men’s small.

 Kyber Crystal – quartz with chlorite. I encourage you to find a local gem and crystal store in your town. It gives you a chance to support a local business and you can get your hands on the crystal to confirm it is the shape and size you want. And if you are interested in sustainable procurement practices, you might also be able to confirm where the minerals came from.
There are also a number of Jyn-inspired necklaces on Etsy for between $18 and $30.
I also gave ‘Hope’ tattoos to every Leia cosplayer I met. 
For additional tutorials and interpretations of the costume, I recommend visiting the Replica Prop Forum open build thread on Jyn’s costume.
View my previous post for more photos of the costume in action.
Now, go forth and cosplay. May the Force be with you!

MARVELOUS! I am bookmarking this for when (not if) my daughter wants to be Jyn. If you are interested you can see the Leia, Padme, C-3PO, and Rey costumes (as well as and many other Star Wars characters) we have made on our blog. …and May the Fourth be with You!
– Anette
https://maythefourthbewithyoupartyblog.com
Bravo! Bravo! Great job with all those tricky details!
Brilliant!! Thanks so much for sharing, I’m excited to start mine!
Wow, that’s a realy great costume!
Thank you, Kara. I am very proud of it.
This is probably my favorite part of cosplay design or costuming; looking at sources and figuring it out. I love watching Adam Savage’s unTested videos for the same reason; I have no need for an authentic Dekker gun from Blade Runner, but I can listen to him all day discussing his process and research. He made several iterations of it.
Such good work, and great photos to boot!
Thank you so much for writing this up! Great advice and your end results are lovely.
Thank you. Please let me know if you have any questions.
thank you so much for putting this up, wonderful guide!
You are welcome! Let me know if you have any questions.