After staring at screen caps and fiddling with pattern pieces, these are the steps I took to construct the details of Ezio:

Fabric Choices
Under tunic: Lightweight linen, cotton, or broadcloth would work very nicely for the under tunic. They have the right weight and drape, the only issue is wrinkles. If you don’t mind wrinkles from sitting, then this isn’t an issue. If I had not stumbled onto curtain lining fabric by chance, I would have likely chosen a lightweight cotton sateen or broadcloth.
This curtain lining was a cotton-polyester blend, so it was less likely to wrinkle. It was thin enough (but also opaque) that I felt it would enhance the “puffy” tunic sleeve. There was also a slight sheen to the fabric, making it pop a little more than a basic cotton would.
Doublet and Cape: Historically, doublets were often padded as they evolved from military garments (under armor). To produce a firm, structured garment these close fitting doublets would have been made from multiple layers of fabric (including padding & canvas beneath the exterior wool, linen, or silk) (Thursfield 2001:95).
In an effort to achieve the stiffer structured look, but also remain relatively flexible, I opted for a washable white microsuede upholstery fabric. You might recognize this as couch fabric. Certainly not the most authentic (100% polyester, I believe). The sheen of the fabric made Ezio look a cut above the linen- and wool-only commoners, but still less opulent than the silk- and velvet-laden nobility. The weight of the fabric gave the cape some good draping effects.
Red Accents and lining:
Initially the red lining (and sash) was a beautiful red taffeta. It had the ideal drape, shine, and texture for Renaissance Italy, and the color matched Ezio perfectly. You can read about the mishap with this taffeta bleeding on the white garments here and here.
This situation showed me that I need to learn more about fabrics and factor “color fasting” into my project timeline. I repaired the Ezio costume for PAX Prime 2012 with a decent red satin that did not bleed. (I tested it on a scrap of the white microsuede before purchasing.)
Sewing Techniques and Details
Topstitching:
During a corset-making class, I learned about the aesthetic and function benefits of topstitching. By pressing both sides of the seam allowance to one side (use an iron), and then stitching on the garment’s exterior 1/8″ or 1/4″ from the first seam line, the seam less likely to tear. A corset needs to be strong enough to withstand the force that goes into the lacing one up and the force of the body pushing out.
This is very similar to the contrast topstitching you see on your favorite pair of jeans. The extra stitches help the garment made of heavy fabric keep its intended shape.
Even though Ezio’s doublet is not a corset, you can see from the screen caps that the pieces of his doublet seem to have some kind of piping or topstictching for reinforcement. He is jumping across rooftops and fighting a lot, so it makes sense that his clothing would need to be durable. (Although, he does own a number of tailors…)
I chose a light gray thread for the topstitching to mimic this contrast stitching. For every seam on the doublet, after sewing two pieces together I pressed the loose ends of the seam allowance *toward* from the center of the garment to match the doublet’s layered look in the screen caps.

I also topstitched the seams on the hood to add decorative stitching and to help the hood keeps its shape. Without the topstitching the hood (made of upholstery fabric) would pucker and bend the wrong way.
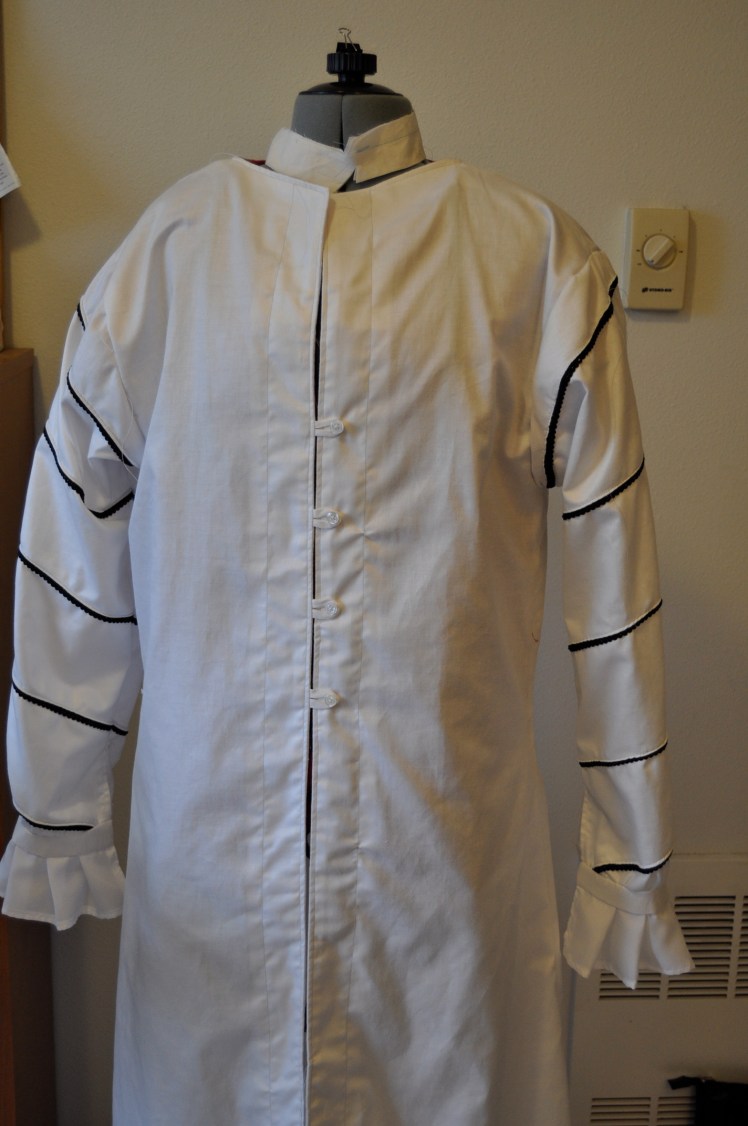
Black spiral trim on the under tunic sleeves:
The two images above provide one example how the clothing from the promo pic and the opening cinematic screen shots differ. In the upper image, the under tunic sleeve look like they have a three lines of decorative stitching spiraling around the sleeve. The lower image makes it look like there was some kind of black fabric sewn into the sleeve.
I opted for a variation on the cinematic screen cap. Decorative trim made more sense to me than just three lines of thread.
I bought 2 or 3 yards of a black trim that resembles fancy knot-work. The fabric store also had a few nice looking decorative black ribbons, that would have been good alternatives.
I actually built the trim into the sleeve pattern, and forgot to mention in Part 2 of this series. I allowed the sleeve pattern to be slightly longer than Greg’s arm so that I would have enough fabric to fold over part of the trim and topstitch in place. (I am sorry I did not take more photos of the sewing process.)
- Align strips of the trim diagonally on the sleeve (use Mueldex’s sleeve template as an example). This will look like a spiral when you sew the sleeve together. Pin in place.
- Starting at one end of the sleeve and working your way to the other end, using thread to match the trim, sew the trim (end to end) to the sleeve.
- For each line of trim, fold the fabric on the shoulder-side of the trim over the trim, now stitch 1/8 from this folded edge. You will be looking at the wrong side of the sleeve and your stitch should pass through fabric-trim-fabric.
- Finally, when you lay your sleeve out, it will look like the trim is sewn into layers of the sleeves. Topstitch these sleeve-trim seams just like you topstitch the doublet.

Fasteners (no zippers allowed!):
Zippers are convenient for the person wearing the costume, but I’ve had problems sewing with them in the past and I did not want a visible zipper to distract from this costume. I opted for buttons and hooks (and a few snaps).
To fasten the under tunic without overlapping the front pieces, I sewed four buttons to one side and created button loops for the other side. I turned to the internets and sewing guides for making button loops.
- Sew a narrow strip of fabric
- Cut it into lengths that are just slightly longer than double the width of your button
- Pin and sew the loops to the “right side” of main fabric (and/or lining). Make sure the loops face away from the seam allowance, so when you fold back the seam allowance of the main fabric, the button loops stick out the other way.
Ezio’s Gear
Thrift stores are your friend. They have belts, leather purses, and miscellaneous materials at affordable prices.
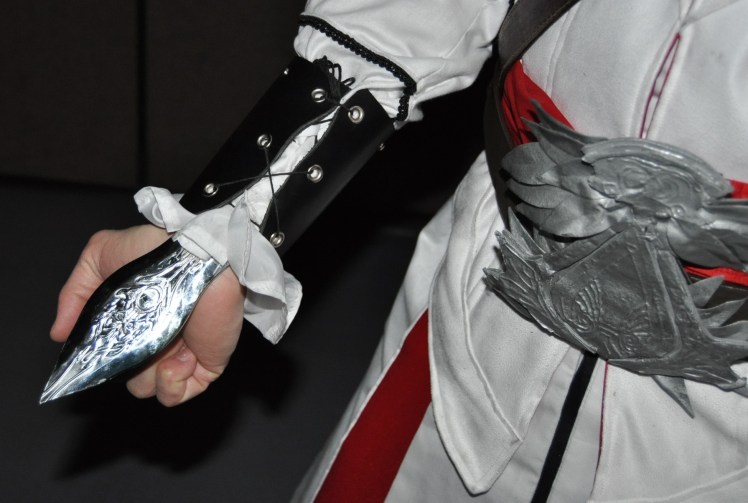
Greg had accumulated some leather gear from Renaissance Fairs, namely the bracers and one leather pouch. But Ezio has at least 3 or 4 belt pouches and a leather pauldron. We took a brown purse apart and turned it into a belt pouch and the leather part of the pauldron.
Greg also carved up a large rubber stamp slab (available at craft stores) to be the paldron armor. Unfortunately, the torque on this large rubber stamp caused it to tear where it had been weakened by the carving.
For the Ezio’s debut Greg made a belt emblem out of cardboard and fake foliage, spray painted it with metallic paint from Home Depot, and glued it over this crazy belt buckle. It has since been revised using the same rubber stamp material.
And that brings us to the end of the Ezio Costume series. I know that I did not touch on all the steps of sewing the costume, but I tried to touch on the major design elements. Please feel free to contact me with any questions.




Great instructions and your pictures are very helpful. Did you add facings along the bottom to get the 2 inch border or did you just hem and top stitch?
I am glad you found this informative!
You are referring to the hem on the doublet, right? I did add a facing.
I cut two hem pattern pieces, sewed them together first, and then stitched the exterior hem piece to the rest of the doublet. I wanted the bottom edge of the hem to be finished and sturdy.
The topstitching caught the edge of the interior hem facing and kept it all in place.
I also added facings to the undertunic hem and center front and then topstitched to hold those facings in place.
Awesome work! Just started on an Ezio brotherhood outfit, and this is really helping me get started. My background is more in leather and propwork.
Did you do a full pattern at any point?
While I did draft patterns for the costume (partly adapted from existing commercial patterns), I do not yet have anything I could easily pass along to others. I’ve been meaning to draw a few diagrams (now that I finally have a scanner) to show how I adapted each of the commercial patterns.
Would you find that helpful?
Sorry for the slow response, just got back into college and classes are rough. lol
Very helpful. 🙂 I always appreciate any advice.
I’ve got a passable mock up for the inner top with the ribbons, but the sleeves/shoulders need some work. The doublet is going to be the hard one (for me at least), since a lot of the inner tunic is hidden.
Stopped by the leather shop today to pick up what I’ll need for the leather, and “Spring” break is next week so I’ll actually have time to work. So hopefully I can have a good chunk knocked out soon.
I’ll see what I can pull together over the next week or so in terms of illustrations/suggestions. For the sleeves, I just used an existing Renaissance pattern (Simplicity 4059) of a shirt sleeve and “forced” it into the sleeve opening of the tunic.
Awesome. 🙂 Thank you.
Yeah, I was trying to use the same pattern. I just can’t get the seems right. Might just be a matter of practice.
I did some folding to reduce the width of both the sleeve and the tunic. I may have also adjusted the tunic armhole to match the renaissance shirt armhole…when are you hoping to have this completed by?
I have spring break this week, so I’ll be working on it a lot. There is a con in early April, but if its not done by then I won’t be heart broken. 🙂 I just want to get it done sooner rather than later. I have other projects I want to work on, but I made a promise to myself not to start anything else till this is done.
I’m going to try and knock out as much of the leather as I can until I’m sure about the sewing part. I have no problem messing up old bed sheets. Expensive fabric on the other hand….lol
Please let me know if this is helpful or not: https://fabricalchemist.com/2013/03/17/ezio-tunic-doublet/
Just wanted to let you know that I am revisiting my notes and working on a couple basic illustrated instructions for the undertunic and the doublet. I’ll try to get this finished before the weekend is over, so you can use them when you work during spring break.
It did. 🙂 Thank you again. If you ever need help in areas I can help, just let me know. I really appreciate it.