

“I’ve heard a great deal about you, Fa Mulan. You stole your father’s armor, ran away from home, impersonated a soldier, deceived your commanding officer, dishonored the Chinese Army, destroyed my palace, and… you have saved us all.” ~ The Emperor of China, Mulan
For making very human mistakes, acting outside her prescribed gender role to do the right thing, and saving China, Mulan is given two prizes as proclamation of her deeds:
- The Crest of the Emperor, so that her family will know what Mulan did to save the Emperor’s life, and
- The Sword of Shan Yu, so that everyone will know what Mulan has done for China.
Mulan’s end-of-movie Victory Dress was my favorite of her 4+ outfit changes and I wanted my cosplay to include the symbols of her victory – Shan Yu’s sword and the Emperor’s medallion.
This is only my second costume to feature handmade props. As a newbie propmaker I don’t have a wealth of information, but I hope the following templates and tutorials will be useful to anyone planning to make props, not just Mulan cosplayers. Certainly, if you want to learn from some of the masters I look up, check out Punished Props, Volpin Props, Fev Studios, Coregeek Cosplay & Creations, and Steven K. Smith.
Sword of Shan Yu

Materials: 2×3 ft foam core board (the stuff we used for school project displays), spray insulation foam, fast mache or wood filler, and a 1/4-inch wooden dowel.
Tools: larger x-acto knife, sandpaper (150, 220, 320 grit)
Paints and surface coating: mod podge and plastidip spray, silver and gray spray paints, assorted acrylic paints for detail and dry brushing.
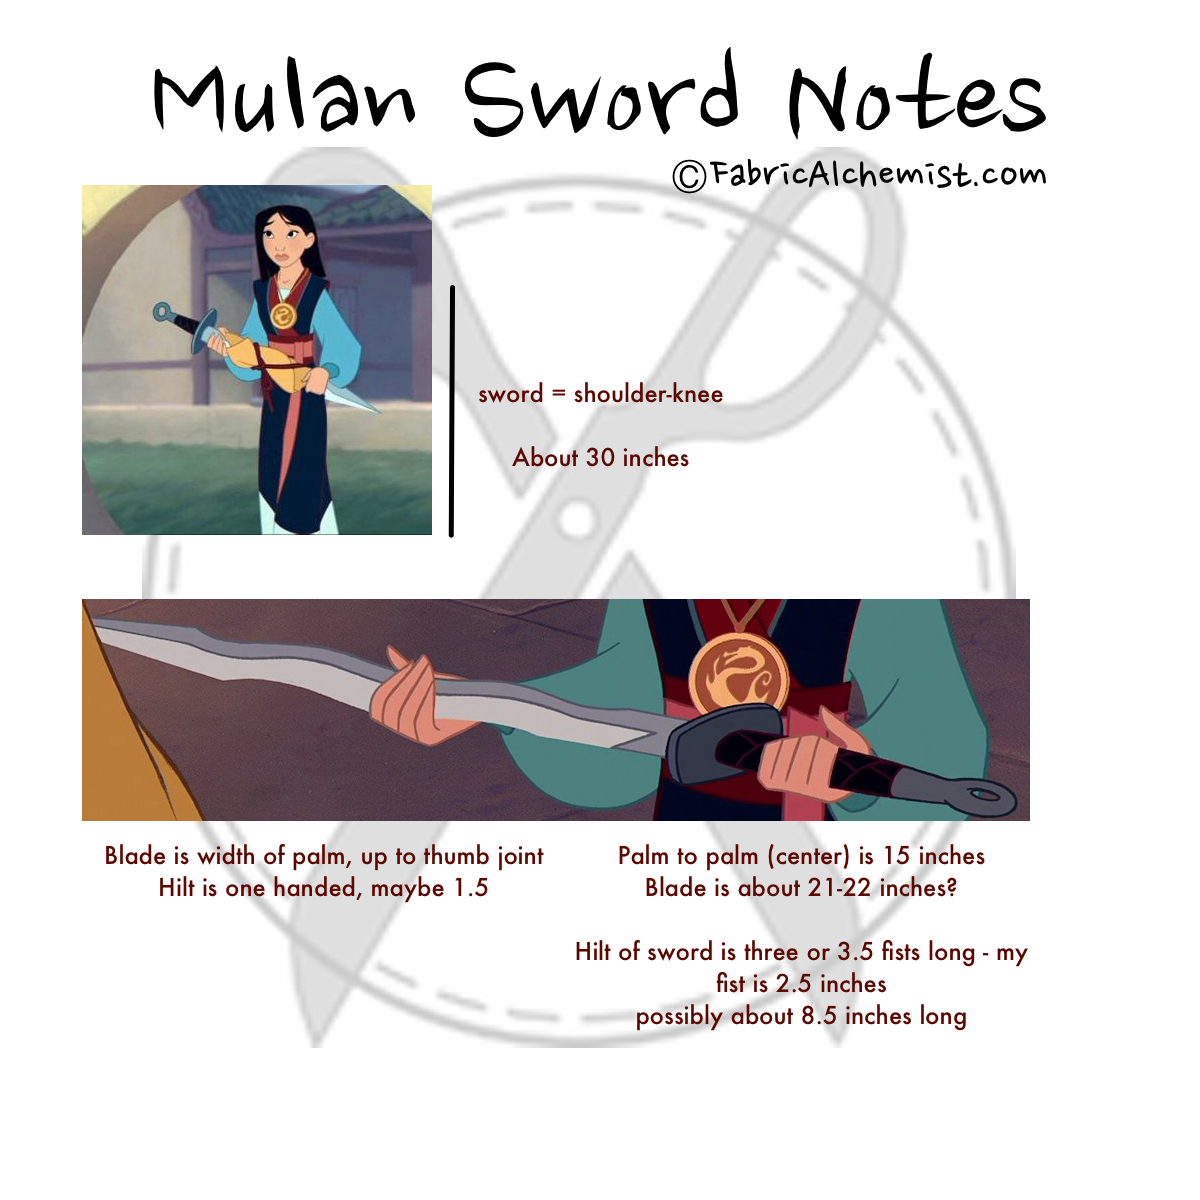
Template: Download the PDF – Mulan Sword Notes – and print at 100%. (Use the rulers to check your printer, confirm that 1 inch = 1 inch.)


Steps:
Blade –
- (After you’ve taped together the template pieces) Trace and cut 2 of the sword and the 2 of the cross guard from foam board.
- Cut the wooden dowel so that it’s length extends into the handle and at least 2/3 of the blade. Sandwich between the two sword pieces.* You may have to carve a small channel for the dowel.
- Cut out the center of the cross guard pieces
- Glue layers together, then slide the cross guard over the sword pommel and hilt.
- Taper the edges of the sword with an x-acto knife held at approximately 45 degree angle. I drew a line 1/2 inch from the edge and beveled between that line and the edge.
- Note – the sword, as illustrated, actually is beveled from the center line out. I did not trust myself to get it right, so I changed the design to be beveled on all edges, on both sides.
Hilt –
- Glue a small rectangle of foam board (it doesn’t have to be exact but should be narrower than the hilt) to either side of the sword hilt to make it thicker.
- Spray Insulation Foam – (see additional notes below*) in a well-ventilated area or outside, spray over hilt and pommel and cross guard. Instructions and YouTube videos suggest spritzing the spray foam with water to help it set faster.
- Using large x-acto knives, start carving the foam down to shape and size you want. Smooth with 220 or 320 sandpaper.
- Use wood filler or fast mache to fill in air pockets and smooth out handle. I used fast mache because I didn’t know what wood filler was at the time. In hindsight I wish I had used wood filler because it can be made smoother on initial application. The Fast Mache (paper pulp and glue) required lots of extra sanding to smooth out the clumps and I’m still not happy. That said, Fast Mache is a good sculpting material alternative for other projects.
Painting –
- I primed the raw foam of the beveled sword edge with a few coats of mod podge. I am not sure if this is necessary, but it may have helped seal the open foam before coating everything in plastidip.
- Outside or in a well-ventilated area, spray at 3-4 coats of plastidip on all sides of sword blade and handle. Let dry a few hours between each coat.
- Paint as desired. I used a chrome spray paint for the blade and a semi-gloss charcoal gray for the handle. I was in a hurry and did not differentiate between the hilt and the pommel. When I have time, I want to go back and repaint. Some friends felt that the chrome paint was too shiny.
- Seal the paint with a layer of spray mod podge or clear sealant.
- And finally, defend China!


Love the photo of you by Rockbomber Studios! What software did you use to make your templates? I’ve been thinking about doing this for some of my projects, but haven’t pulled the trigger yet.
I used a scanner (brother brand) and the Preview PDF reader app on my Mac. Preview has a import feature, similar to Photoshop, that allowed me to scan as individual images and then again as a multi page PDF. It is not as precise as a large format scanner. I did it by hand and eyeballed where to put the matching lines.
Very cool. Thanks for the info!
Your sword looks fantastic! Thanks for sharing your notes and template 🙂
Awesome tutorials! Thank you! I always wonder how people make these kind of things 🙂
Love the group photo by the way!
This was the first time I cosplayed in a group and it was fun to walk around together.