
Assassins Creed costumes have minimal armor, bracer here, a paldron there. So if you are interested in learning cosplay armor, these costumes are a good place to start. (I mean they have their own headaches – cough hoods! Cough.)
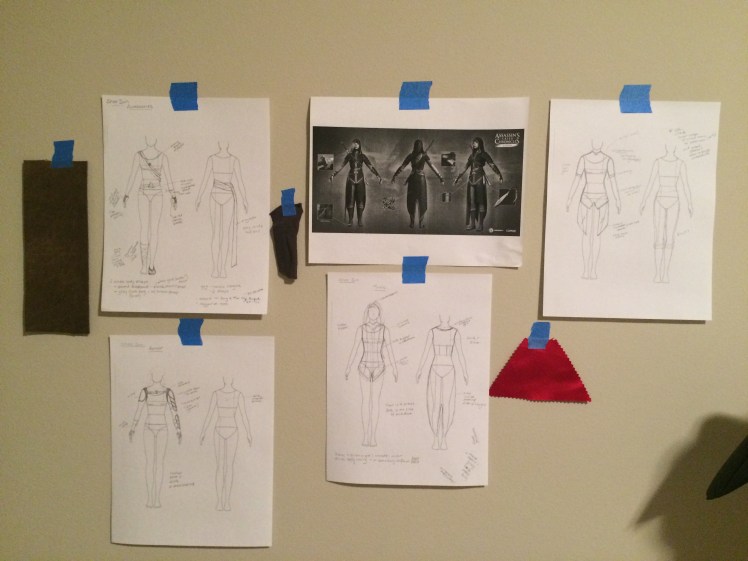
This tutorial and templates are based on the Chronicles armor, which is different than the embers video.
Supplies:
- Black craft foam
- Black Plasti-dip – available from Amazon and Lowe’s and other hardware stores
- X-acto knife
- Black woven fabric (thicker than quilting cotton)
- Brown/black faux leather
- Black elastic
- Brown paint
- Rivets
- Black swimsuit “bra” clasp
This is Armor Version 1.0. I rushed the construction and I think there is more painting I could do to give it a bit more dimension.
Choosing the material
Shao Jun’s armor looks stiff in both of these images, more so than I would expect for leather. China did have bronze and later iron armor, but metal armor seems heavy and loud for a stealthy assassin. It could be some kind of bamboo or bone, based on the striations. I leave it up to you to interpret what material you want to mimic.


I chose craft foam (the kind you can buy from Michael’s or Joann’s) because I thought worbla was going to be too stiff and constricting around my shoulders and the EVA foam that I had was too thick. I’d like to go back and make something that looks more like leather. Whether that means repainting the foam or using a different material altogether, I am not sure. If you want to use worbla, it is doable. If you read Yaya Han’s summary of her Shao Jun costume, you know she used worbla. I wanted to mimic the curved nature around my shoulder, which she skipped.
if you are new to cosplay armor, craft foam is an easy and affordable place to start.
Armor Templates & Construction
I used the same template for the upper arm and the forearm. Although, my upper arm wasn’t long enough for 4 segments, so I swapped out one of the segments when I added the shoulder piece, template included below.

If this template does not work for you, you can draft your own:
- Measure your shoulder to elbow and elbow wrist (then subtract an inch or two for joint movement) for the total lengths of each armor.
- The individual segments of the armor are just a bit less than half of the total distance. They look shorter because of how they overlap.
- The average width of the armor should be enough to curve over the top 1/3 of your arm.

You might be asking, how do I know the shape of my shoulder. I am glad you asked. This is a technique used by cosplayers and seamstresses alike – by wrapping yourself in celophane and then covering that in duct tape you can created a life template of yourself or just a portion. Here I only was interested in my shoulders.
While the very warm contraption is on you, draw a rough outline of the armor you plan to make. This becomes your template when you eventually are free of your body cast.

After gluing the craft foam pieces together with contact cement I cut out black fabric to line the underside of the armor. I did this to give my something to sew into. I’ve tried sewing into craft foam but the thread ends up tearing out of the holes.

Fitting Tip: even though this post appears before the main garments in this series, I recommend you work on armor after you know how thick your layers of fabric will be.
Armor Harness
The harness if 5 pieces — 2 armholes (drafted from the edge of the tunic pattern, see illustration below); 1 back cross strap; 2 partial front cross straps that connect in the center.

I eventually plan to go back and insert rivets into the harness and the armor as you can see in official art from Ubisoft. As I mentioned, this harness was made in a hurry and you can see the wobbly seams.
To insert the swimsuit bra hook as the front clasp for the harness, follow the first part of this tutorial from Seamstress Erin. Good luck!
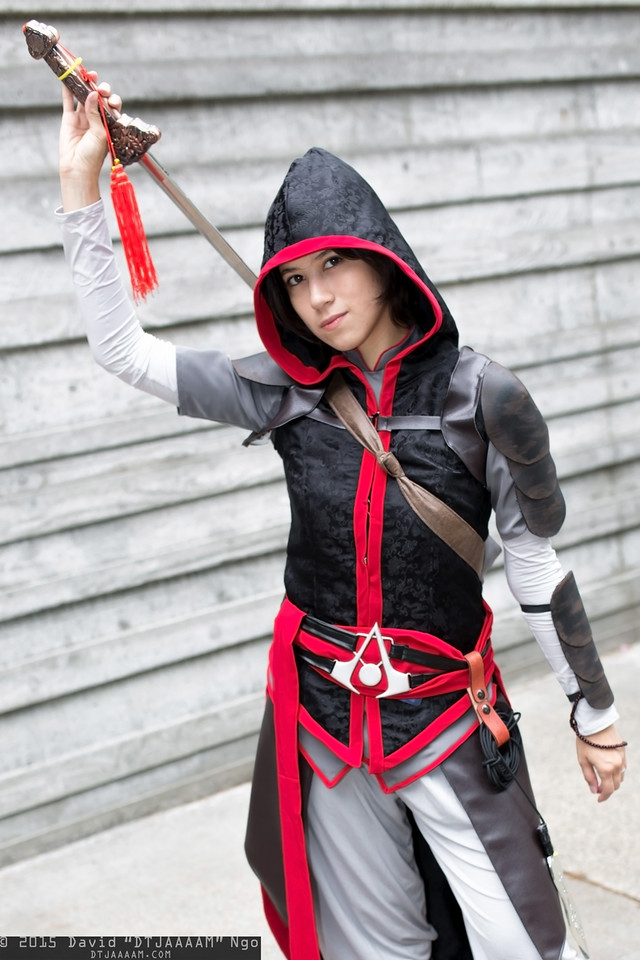
Featured photo credit: David “DTJAAAAM” Ngo, PAX Prime 2015

I would ever have guessed that was craft foam! Looks very protective. 🙂